



Introduction
Recently, Model Context Protocol (MCP) has been gaining significant traction for enabling Agentic AI to integrate with external tools. Exposing existing OpenAPI operations as authorized MCP tools requires two key steps:
- Exposing OpenAPI operations through an MCP server
- Implementing the MCP authorization flow using OAuth 2.1 Authorization Code Grant [draft-ietf-oauth-v2-1-15]
This guide demonstrates how to expose existing OpenAPI operations as authorized MCP tools without modifying the original API code, using agentgateway as an MCP gateway and Keycloak as an MCP authorization server.
What is agentgateway?
agentgateway is an OSS gateway designed to enable diverse integrations within modern Agentic AI systems. Specifically, it can function as an MCP Gateway, an A2A (Agent-to-Agent) Gateway, and an LLM Gateway. When used as an MCP gateway, agentgateway can use OpenAPI-described APIs as backends and apply access-control policies. Agentgateway is an AAIF-hosted project under the Linux Foundation. For more details, please refer to this blog.
What is Keycloak?
Keycloak is an open source identity and access management platform that supports standards including OAuth 2.0, OpenID Connect, and SAML. In this guide, it acts as the authorization server for the MCP endpoint. Keycloak is an incubating project at the Cloud Native Computing Foundation (CNCF). For more information, see the official Keycloak site.
System configuration
Figure 1 shows the system configuration for exposing OpenAPI operations as MCP tools. In this guide, we will prepare a User API and a Pet API as our OpenAPIs. The MCP client and both APIs will be implemented in Python.
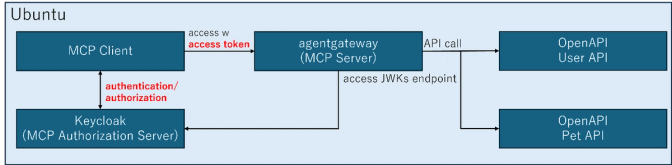
Figure 1 System configuration
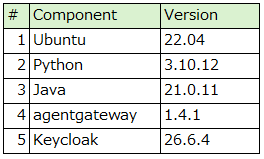
Table 1 shows the components and their versions used in this verification.
Table 1 Component and version
MCP authorization flow
Next, let's look at MCP authorization flow in this verification. Figure 2 illustrates how the MCP Client accesses the backend OpenAPI via agentgateway. Figure 2 shows the flow for accessing the User API.
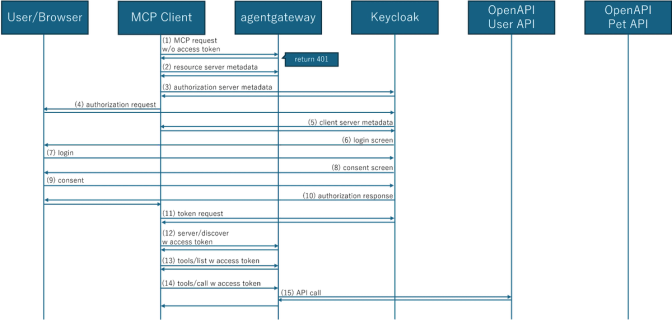
Figure 2 MCP authorization flow with agentgateway and Keycloak
In this flow, we will use Client ID Metadata Document [draft-ietf-oauth-client-id-metadata-document-00] (step (5) in Figure 2), as defined in MCP 2026-07-28. In this configuration, CIMD avoids the need to pre-register the client in Keycloak. We will then use the OAuth 2.1 Authorization Code Grant to obtain an access token, which is used to execute tools/call. Using agentgateway and Keycloak, existing OpenAPI operations can be exposed as authorized MCP tools while keeping the original API implementation unchanged.
Note on production use
While we use localhost and HTTP connections for this local verification, any production deployment must enforce HTTPS and use proper external hostnames instead of localhost. Additionally, please be aware that CIMD support in Keycloak is currently an experimental feature.
Setup
We will explain the setup in the following order: OpenAPI, MCP Client, agentgateway, and Keycloak.
OpenAPI
First is OpenAPI. The following shows the specification for the User API we will use. Some details have been omitted for simplicity.
info:
  title: User API
  version: 1.0.0
servers:
  - url: http://localhost:8000
paths:
  /users/{user_id}:
    get:
      operationId: get_user
      description: >
        Returns user data for the specified ID.
        For this verification, it returns a fixed response in which the
        id field is set to the same value as the user_id path parameter.
        Example:
        {"id": 1, "name": "Taro Yamada", "email": "yamada@example.com"}
      parameters:
        - name: user_id
          in: path
          required: true
          schema:
            type: integer
            title: User Id
      responses:
        '200':
          description: Successful Response
          content:
            application/json:
              schema:
                $ref: '#/components/schemas/User'
  /users:
    post:
      operationId: create_user
      description: >
        Registers the user data provided in the request
        and returns the registered user data.
      requestBody:
        content:
          application/json:
            schema:
              $ref: '#/components/schemas/User'
        required: true
      responses:
        '200':
          description: Successful Response
          content:
            application/json:
              schema:
                $ref: '#/components/schemas/User'
components:
  schemas:
    User:
      properties:
        id:
          type: integer
          title: Id
          example: 1
        name:
          type: string
          title: Name
          example: Taro Yamada
        email:
          type: string
          title: Email
          example: yamada@example.com
      type: object
      required:
        - id
        - name
        - email
      title: User
The following shows the specification for the Pet API we will use. Some details have been omitted for simplicity.
info:
  title: Pet API
  version: 1.0.0
servers:
  - url: http://localhost:8001
paths:
  /pets/{pet_id}:
    get:
      operationId: get_pet
      description: >
        Returns pet data for the specified ID.
        For this verification, it returns a fixed response in which the
        id field is set to the same value as the pet_id path parameter.
        Example:
        {"id": 1, "type": "dog", "name": "hachi"}
      parameters:
        - name: pet_id
          in: path
          required: true
          schema:
            type: integer
            title: Pet Id
      responses:
        '200':
          description: Successful Response
          content:
            application/json:
              schema:
                $ref: '#/components/schemas/Pet'
  /pets:
    post:
      operationId: create_pet
      description: >
        Registers the pet data provided in the request
        and returns the registered pet data.
      requestBody:
        content:
          application/json:
            schema:
              $ref: '#/components/schemas/Pet'
        required: true
      responses:
        '200':
          description: Successful Response
          content:
            application/json:
              schema:
                $ref: '#/components/schemas/Pet'
components:
  schemas:
    Pet:
      properties:
        id:
          type: integer
          title: Id
          example: 1
        type:
          type: string
          title: Type
          example: dog
        name:
          type: string
          title: Name
          example: hachi
      type: object
      required:
        - id
        - type
        - name
      title: Pet
Each API requires access control based on roles and scopes. Table 2 shows the requirements. This access control logic will not be implemented in OpenAPI itself but will be handled by agentgateway and Keycloak, which we will set up later.
Table 2 Access control requirements

We will implement the User API and Pet API using the FastAPI framework. The source code is available here.
Start User API on port 8000 with the following command:
# uvicorn main:app --reloadStart Pet API on port 8001 with the following command:
# uvicorn main:app --reload --port 8001OpenAPI specification is required to configure agentgateway. FastAPI automatically generates this for us. Access http://localhost:8000/openapi.json and http://localhost:8001/openapi.json to obtain the specifications for the User API and Pet API. Then, save them as openapi_user.json and openapi_pet.json, respectively. The specifications used in this verification are available here.
MCP Client
Next is MCP Client. For this verification, we will prepare a simple MCP Client that implements the following functions:
- Calling the MCP Server (steps (1), (12)-(14) in Figure 2)
- Obtaining Metadata (steps (2), (3) in Figure 2)
- Providing Client ID Metadata Document (step (5) in Figure 2)
- Executing OAuth 2.1 Authorization Code Grant (steps (4), (10), (11) in Figure 2)
We will implement the MCP client using the FastMCP framework. The source code is available here. Please note that this code is simplified for verification purposes, and some processes are omitted.
Start the MCP Client with the following command.
# python client_with_auth.py <tool_name> "<additional_scopes>" This code takes the tool name to be executed and any additional scopes as arguments. If omitted, the tool name defaults to user_create_user and the additional scope defaults to none.
agentgateway
Next is agentgateway. We will set up a standalone version of agentgateway for this simple verification. First, install agentgateway with the following command:
# curl https://raw.githubusercontent.com/agentgateway/agentgateway/refs/heads/main/common/scripts/get-agentgateway | bashVerify the installation by checking the version:
# agentgateway --version Next, we configure agentgateway. The YAML file used for this verification is available here. Table 3 shows the main settings.
Table 3 agentgateway settings
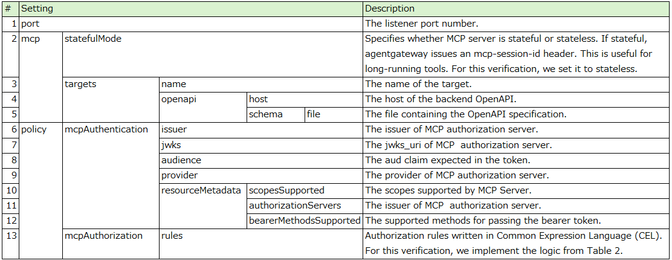
Finally, start agentgateway using the YAML file:
# agentgateway -f config.yaml Keycloak
Finally, let's set up Keycloak. We will use a standalone version for this simple verification. Download the zip file from here, unzip it, and start it in development mode with the following command:
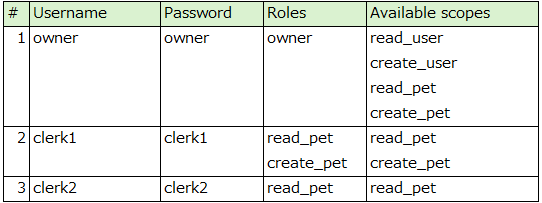
# ./bin/kc.sh start-dev --features=cimdSince we are using the Client ID Metadata Document feature, we set cimd in the --features option. After startup, access http://localhost:8080, create an administrator user, and set up Keycloak from the admin console. The Keycloak settings are available here, so a detailed explanation is omitted. Table 4 summarizes the user accounts that are important for this verification.
Table 4 User accounts
Verification
Now that the setup is complete, let's proceed with verification. The available MCP tools change depending on the user and the scopes included in the authorization request. Table 5 shows the combinations.
Table 5. Available API operations by user and requested scope
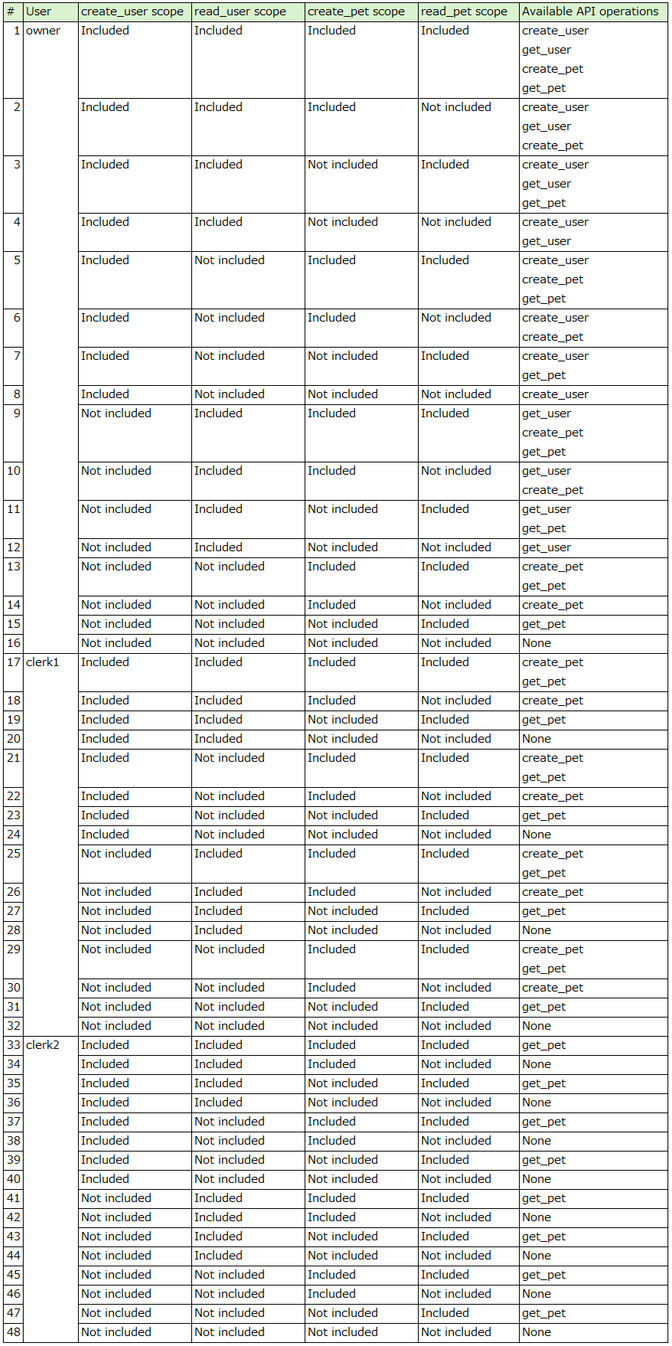
We will perform our verification based on Table 5. This guide covers the verification cases in Table 5: #1, #16, #17, #32, #33, and #48.
Verification for owner
First, we will verify the operation when authenticated as the owner user.
Verification for Table 5, #1
The API operation being tested is create_user, using the create_user, read_user, create_pet, and read_pet scopes. When agentgateway has multiple targets, the tool name is generated by concatenating the target name and the operationId with an underscore (_). Therefore, the command to execute the MCP Client is as follows:
# python client_with_auth.py user_create_user "create_user read_user create_pet read_pet"When you run the MCP Client, your browser will automatically open and display the Keycloak login screen. If the browser does not open automatically, the following log will be output by the MCP Client. In that case, please open your browser manually and send the authorization request.
=== FLOW (4): authorization request ===
Open your browser. If your browser doesn't open, please manually access the following URL:
http://localhost:8080/realms/sample/protocol/openid-connect/auth?response_type=code&client_id=http%3A%2F%2Flocalhost%3A8081%2Foauth%2Fmetadata.json&redirect_uri=http%3A%2F%2Flocalhost%3A8081%2Fcallback&scope=openid+petshop-roles+create+read&code_challenge=rYXO7hwBVo9ayjx4Md6VlCeJAyZMjN3AC4FgYssdBRI&code_challenge_method=S256
Enter owner for both the username and password, and click the login button. A consent screen will appear; please grant your consent. After that, the following will be output to the MCP Client's log:
=== FLOW (12)-(14): MCP request with access token ===
--- Available MCP Tools ---
- user_get_user: get a user
- user_create_user: register a user
- pet_get_pet: get a pet
- pet_create_pet: register a pet

Run tool: [user_create_user] ...

================================
===        MCP RESULT        ===
================================
{"id":4,"name":"jiro tanaka","email":"tanaka@example.com"}
You can confirm that the "Available MCP Tools" output in the log matches what was expected in Table 5, #1. This happens because agentgateway validates the access token issued by Keycloak and, based on the rules configured in Table 3, #13, returns only the available tools to the MCP Client. Additionally, the "MCP RESULT" is output, indicating that the MCP Client was able to use the tool successfully.
Verification for Table 5, #16
The API operation being tested is create_user, without any additional scopes. The command to execute the MCP Client is as follows:
# python client_with_auth.py user_create_userThe steps after execution are the same, so they are omitted. The following will be output to the MCP Client's log:
=== FLOW (12)-(14): MCP request with access token ===
--- Available MCP Tools ---

Run tool: [user_create_user] ...

===============================
===        MCP ERROR        ===
===============================
JSON-RPC Error Code: -32602
JSON-RPC Error Message: Unknown tool: user_create_user
===============================
You can confirm that there are no "Available MCP Tools" listed in the log, which matches what was expected in Table 5, #16. This happens because agentgateway validates the access token issued by Keycloak and, based on the rules configured in Table 3, #13, returns only the available tools to the MCP Client. In this test, an attempted call to the unavailable tool is rejected by agentgateway with an error response containing error code -32602 and the error message Unknown tool, showing that the configured authorization rules are also applied to tools/call.
Verification for clerk1
Next, we will verify the operation when authenticated as the clerk1 user.
Verification for Table 5, #17
The API operation being tested is create_pet, using the create_user, read_user, create_pet, and read_pet scopes. The command to execute the MCP Client is as follows:
# python client_with_auth.py pet_create_pet "create_user read_user create_pet read_pet"Since the login user is clerk1, enter clerk1 for both the username and password on the login screen. All other steps remain the same. The following will be output to the MCP Client's log:
=== FLOW (12)-(14): MCP request with access token ===
--- Available MCP Tools ---
- pet_get_pet: get a pet
- pet_create_pet: register a pet

Run tool: [pet_create_pet] ...

================================
===        MCP RESULT        ===
================================
{"id":2,"type":"cat","name":"tama"}
================================
You can confirm that the "Available MCP Tools" output in the log matches what was expected in Table 5, #17. This happens because agentgateway validates the access token issued by Keycloak and, based on the rules configured in Table 3, #13, returns only the available tools to the MCP Client. Additionally, the "MCP RESULT" is output, indicating that the MCP Client was able to use the tool successfully.
Verification for Table 5, #32
The API operation being tested is create_pet, without any additional scopes. The command to execute the MCP Client is as follows:
# python client_with_auth.py pet_create_petThe steps after execution are the same, so they are omitted. The following will be output to the MCP Client's log:
=== FLOW (12)-(14): MCP request with access token ===
--- Available MCP Tools ---

Run tool: [pet_create_pet] ...

===============================
===        MCP ERROR        ===
===============================
JSON-RPC Error Code: -32602
JSON-RPC Error Message: Unknown tool: pet_create_pet
===============================
You can confirm that there are no "Available MCP Tools" listed in the log, which matches what was expected in Table 5, #32. This happens because agentgateway validates the access token issued by Keycloak and, based on the rules configured in Table 3, #13, returns only the available tools to the MCP Client. In this test, an attempted call to the unavailable tool is rejected by agentgateway with an error response containing error code -32602 and the error message Unknown tool, showing that the configured authorization rules are also applied to tools/call.
Verification for clerk2
Finally, we will verify the operation when authenticated as the clerk2 user.
Verification for Table 5, #33
The API operation being tested is get_pet, using the create_user, read_user, create_pet, and read_pet scopes. The command to execute the MCP Client is as follows:
# python client_with_auth.py pet_get_pet "create_user read_user create_pet read_pet"Since the login user is clerk2, enter clerk2 for both the username and password on the login screen. All other steps remain the same. The following will be output to the MCP Client's log:
=== FLOW (12)-(14): MCP request with access token ===
--- Available MCP Tools ---
- pet_get_pet: get a pet

Run tool: [pet_get_pet] ...

================================
===        MCP RESULT        ===
================================
{"id":1,"type":"dog","name":"hachi"}
================================
You can confirm that the "Available MCP Tools" output in the log matches what was expected in Table 5, #33. This happens because agentgateway validates the access token issued by Keycloak and, based on the rules configured in Table 3, #13, returns only the available tools to the MCP Client. Additionally, the "MCP RESULT" is output, indicating that the MCP Client was able to use the tool successfully.
Verification for Table 5, #48
The API operation being tested is get_pet, without any additional scopes. The command to execute the MCP Client is as follows:
# python client_with_auth.py pet_get_petThe steps after execution are the same, so they are omitted. The following will be output to the MCP Client's log:
=== FLOW (12)-(14): MCP request with access token ===
--- Available MCP Tools ---

Run tool: [pet_get_pet] ...

===============================
===        MCP ERROR        ===
===============================
JSON-RPC Error Code: -32602
JSON-RPC Error Message: Unknown tool: pet_get_pet
===============================
You can confirm that there are no "Available MCP Tools" listed in the log, which matches what was expected in Table 5, #48. This happens because agentgateway validates the access token issued by Keycloak and, based on the rules configured in Table 3, #13, returns only the available tools to the MCP Client. In this test, an attempted call to the unavailable tool is rejected by agentgateway with an error response containing error code -32602 and the error message Unknown tool, showing that the configured authorization rules are also applied to tools/call.
Conclusion
In this guide, we exposed existing OpenAPI operations as authorized MCP tools without modifying the original API code, using agentgateway as an MCP gateway and Keycloak as an MCP authorization server. Once this foundational use case is complete, a common next step is extending the architecture to handle more realistic scenarios. Although the OpenAPI used for this guide was simple and did not interact with external systems, real-world APIs often need to call additional downstream backend APIs. Such scenarios are commonly implemented via a Token Exchange. Both agentgateway and Keycloak provide Token Exchange capabilities, which could be explored in a future configuration for downstream API access. The exact setup would depend on the token audience, scopes, clients, and backend requirements.
Share
Authors


Yoshiyuki Tabata
Chief OSS Consultant at Hitachi, Ltd. / CNCF TAG Security and Compliance Tech Lead / CNCF Ambassador / AAIF Ambassador
View All Posts

Michito Okai
Michito Okai is a software engineer at Hitachi, Ltd. He engages in authentication and authorization technical support. Also, he is a contributor to Keycloak and MCP Conformance Test Framework.